
【Ruby】每天一點 Rails:Google 第三方登入/Sorcery/ngrok
關於 Google 第三方登入設定的過程筆記。

前提:初學者的學習筆記,僅供參考,敬請指教~
- Rails 版本:6.1.5
- Ruby 版本:2.7.5
- 會員登入套件:Sorcery
- URL 測試:ngrok
Sorecery external:Sorecery 第三方登入的必要套件
在專案中安裝 Sorecery external:
rails g sorcery:install external --only-submodule
打開 sorecery.rb:
# 解開這行註解,並加入允許的第三方對象
config.external_providers = [:google]

# 解開以下註解,並依序進行設定
config.google.key = "" # 需取得 google API
config.google.secret = "" # 需取得 google API
config.google.callback_url = "http://my-app.com/oauth/callback?provider=google" # 登入後重新導向的網址,需取得公開網址
config.google.user_info_mapping = "" # 依照 User Model 跟 google 的設定設置
sorecery.rb 檔的設定,我們必須先為我們的專案設置一個公開的網址,以及取得 Google API。
取得公開網址:ngrok
在進行網站開發的時候,常常有功能需要連接到外部網域,比如今天要講的第三方登入。如果我們用本機的locallhost測試,基本上都會出狀況。但如果只是為了測試,而特地部署到雲端,也是一件麻煩的事情。
這時候就可以使用 ngrok 提供的服務,讓我們的本地 port 連結到外網的一個公開網址,這樣就可以模擬網站上線後的狀況。
使用 ngrok 的方法很簡單,它也有提供免費的服務,不過會有使用時間上的限制,大約兩個小時會失效,這部分就要使用者自己注意了。
依照官網的指示,很快就可以開始使用,流程如下:
- 註冊 ngrok 的帳號。
- 點選 Getting Started ,依照指示安裝 ngrok:
如果是 Mac 的用戶,可以直接使用 Homebrew 安裝:
brew install ngrok --cask- 將得到的 Authtoken 寫入設定檔。
- 輸入本地 port (Rails 預設是3000)
ngrok http 3000。- ngrok 會提供一組公開網址,我們就可以靠這個網址連到 server :
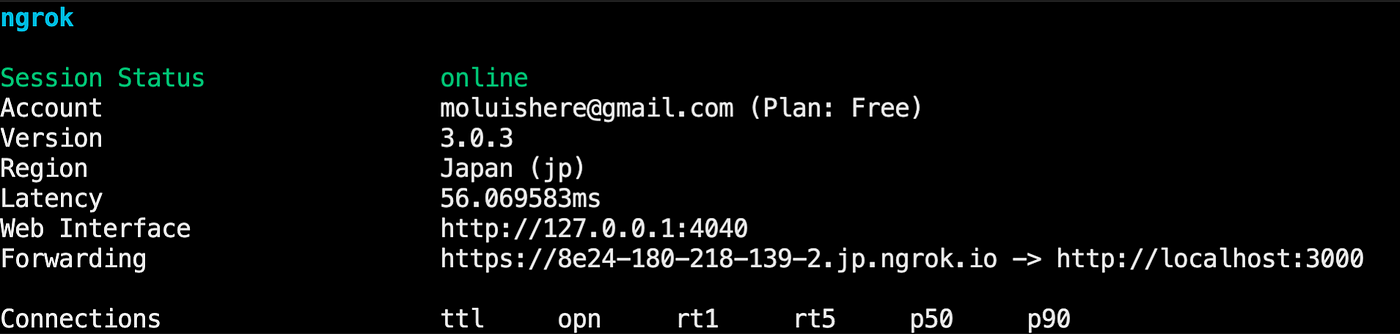
我們有了可以使用的公開網址,接著把它設定到 sorcery.rb:
# 登入後重新導向的網址,需取得公開網址
config.google.callback_url = "<ngro_uri> oauth/callback?provider=google"
取得 Google API
- 前往Google Cloud Platform (GCP) 建立專案。
- 點選 API和服務 > 憑證 > 建立 OAuth 用戶端 ID。需要注意的是
已授權重新導向URI,要填入才能在登入後重新導向: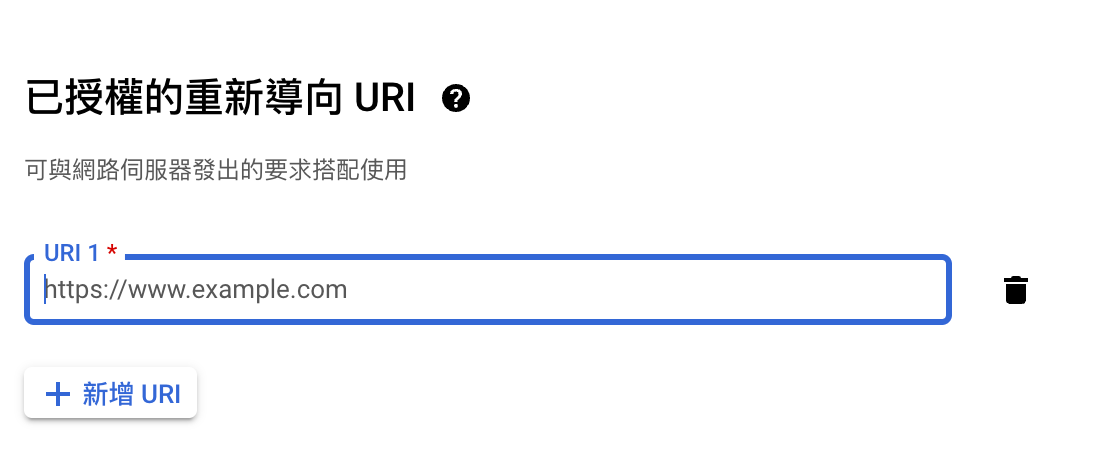
# 這組網址是在先前設定的 sorcery.rb 取得 <ngro_uri> oauth/callback?provider=google - 得到用戶端編號(Client ID)、用戶端密碼(Secret)。
得到這兩組 API 後 ,我們還需要將其設定成環境變數。
第三方登入與環境變數設置
在 Gimfile 加入以下幾行,記得 bundle install。
# 身份驗證
gem 'omniauth'
gem 'omniauth-google-oauth2'

# 環境變數設置
gem 'figaro'
figaro 會生出環境變數設置的相關檔案config/application.yml,並將檔案加入.gitignore,讓該檔案不進入版控,防止我們的 key 被推上 GitHub。
除了戶端編號和用戶端密碼,我們也可以將 ngrok 的網址設定為環境變數,到時候時效過期,我們只要去改環境變數的設定,以及到 Google API 更改重新導向的網址,就不用每次都要全部重新修改:
# config/application.yml
google_client_id: "<Client ID>"
google_client_secret: "<Secret>"
host_name: "<ngrok_uri>"
這時候我們回到 sorcery.rb,把剩下的設定完成:
# config/initialzers/sorcery.rb
# 解開這行註解,並加入允許的第三方對象
config.external_providers = [:google]

# 解開以下註解,並依序進行設定
config.google.key = ENV['google_client_id']
config.google.secret = ENV['google_client_secret']
config.google.callback_url =  "https://#{ENV['host_name']}/oauth/callback?provider=google"
config.google.user_info_mapping = {:email => "email"}
最後到 development.rb 設定config.hosts:
# config/environment/development.rb
Rails.application.configure do
  config.hosts << ENV['host_name']
end
Sorecery 檔案設定
user.rb,找到 authenticates_with_sorcery! 並增加以下內容:
# app/models/user.rb
class User < ApplicationRecord
  authenticates_with_sorcery! do |config|
    config.authentications_class = Authentication
  end

  has_many :authentications, :dependent => :destroy
  accepts_nested_attributes_for :authentications
end
在登入頁面的 erb檔 加上連結:
<%= link_to 'Login with Google', auth_at_provider_path(provider: :google) %>
接著建立一個身份驗證的Model:
rails g model Authentication --migration=false
建立 Oauthscontroller:
rails g controller Oauths oauth callback
設定內容:
# app/controllers/oauths_controller.rb
class OauthsController < ApplicationController
  skip_before_action :require_login, raise: false

  # sends the user on a trip to the provider,
  # and after authorizing there back to the callback url.
  def oauth
    login_at(params[:provider])
  end

  def callback
    provider = params[:provider]
    if @user = login_from(provider)
      redirect_to root_path, :notice => "Logged in from #{provider.titleize}!"
    else
      begin
        @user = create_from(provider)
        # NOTE: this is the place to add '@user.activate!' if you are using user_activation submodule

        reset_session # protect from session fixation attack
        auto_login(@user)
        redirect_to root_path, :notice => "Logged in from #{provider.titleize}!"
      rescue
        redirect_to root_path, :alert => "Failed to login from #{provider.titleize}!"
      end
    end
  end

end
oauth method 會將使用者重新導向到我們設置的 provider (網址)。
callback method 則是 google 調用的方法,並最終導向我們設置的 route。
最後來設置我們的 routes.rb:
# routes.rb
post "oauth/callback" => "oauths#callback"
get "oauth/callback" => "oauths#callback"
get "oauth/:provider" => "oauths#oauth", :as => :auth_at_provider
最後記得 rails db:migrate
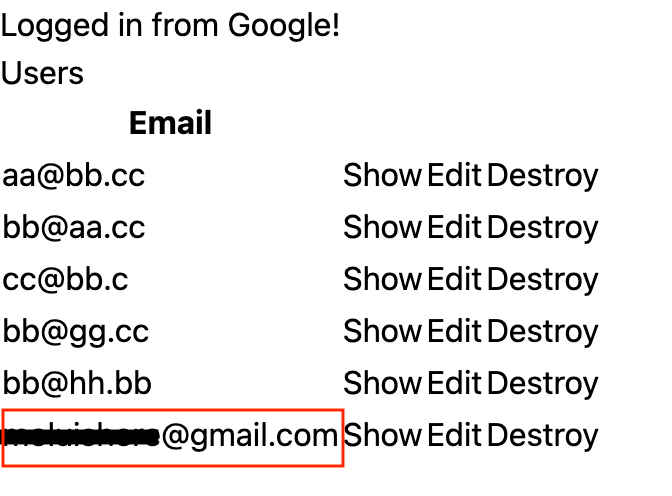
試了好幾次終於大功告成:
筆者在設定期間有踩到幾個雷:
Callback URL
一開始不清楚 Callback Url 的作用是什麼,在 Google API 以及 sorcery.rb 兩個寫入了不同的網址。後來才了解Callback Url是指在驗證完使用者身份並獲得授權同意後,把使用者帶回指定的路徑。
在stackoverflow 有一篇相關詢問 What is a callback URL in relation to an API?,最佳解如下:

不過,還有一個 Return Url , 這兩者的差異就需要研究一下了。
- 環境變數的設置
設定好環境變數後,筆者在 sorcery.rb 中加上了"",變成了"ENV['google_client_id']",把變數變成了字串。在改檔案的時候切記,要好好注意自己在寫什麼!
參考文章: